How to Make Animation Hit the Kick Drum in After Effects (2026)
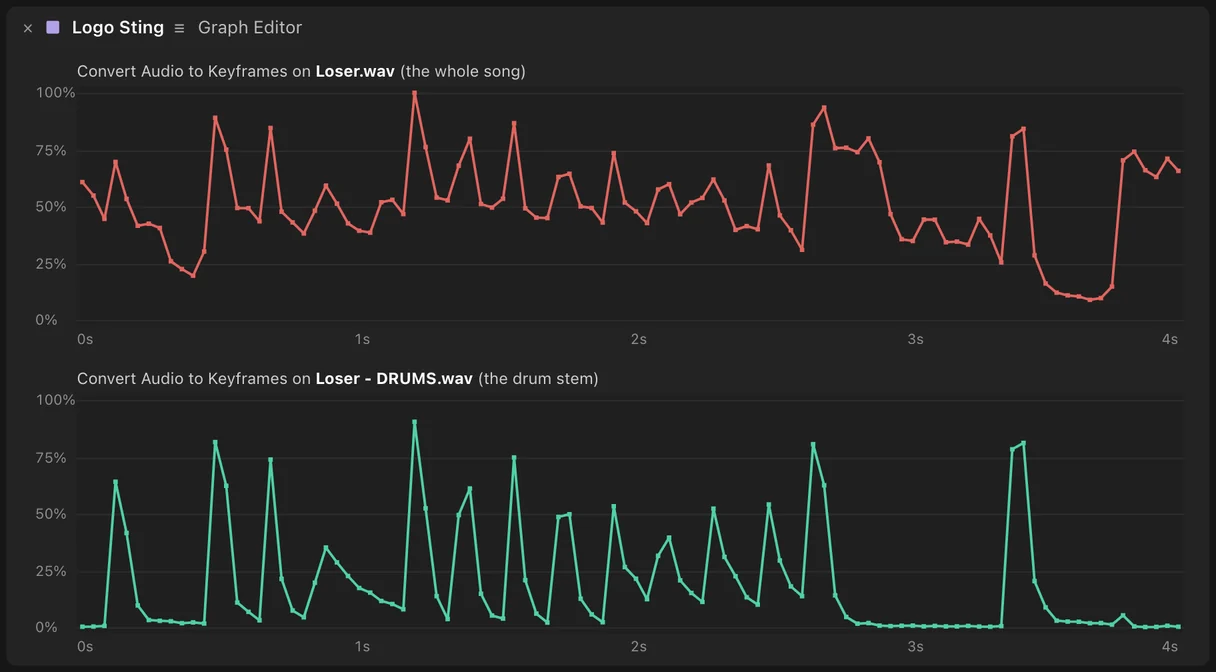
To make animation hit the kick drum in After Effects, run Convert Audio to Keyframes on the drums alone, not on the song. The tool measures the loudness of everything you can hear in the comp, so with the full song it reacts to vocals, bass, pads and hi-hats as well, and your logo wobbles instead of punching. Split the song into stems first, keep only the drum stem audible, convert that to keyframes, and link the result to Scale with one expression.
This guide covers why the default result looks mushy, the EQ workaround most motion designers use, the stem method step by step, and the expression to paste.
Why Convert Audio to Keyframes looks mushy
Animation, Keyframe Assistant, Convert Audio to Keyframes creates a null layer called Audio Amplitude with three sliders: Left Channel, Right Channel and Both Channels. Each gets one keyframe per frame, set to how loud the comp is at that moment.
That's overall loudness, not hits. In a finished song, the vocal, the bass and a sustained pad keep the level high between kicks, so the slider never drops far. Link it to Scale and the layer floats up and jitters instead of popping on each beat. On the Adobe Community, motion designers report keyframes that hover high even through quiet passages, and that the tool converts all the audio in the comp, not just the part they wanted.
The usual workaround: EQ and a precomp
The common fix is to fake a kick track: precompose the song, add a low-pass filter (or Bass and Treble) to keep only the low end, then convert that.
It helps, but the bass guitar lives in the same low frequencies as the kick, so bass notes still trigger the animation. Snares and claps mostly get filtered out, so you can't animate to those. And you rebuild the precomp on every project.
The stem method, step by step
- Split the song. Select the song layer and click Split Stems in the StemSplitter panel. Six layers land under it: Vocals, Drums, Bass, Guitar, Piano and Other. The original is switched off.
- Keep only the drums audible. Turn off the audio switch (the speaker icon) on every layer except Drums. If the keyframes still react to the other parts, precompose the Drums layer on its own and run step 3 inside that precomp.
- Convert. Select the Drums layer and choose Animation, Keyframe Assistant, Convert Audio to Keyframes. You get an Audio Amplitude null.
- Turn the other stems back on if you want to hear the full song while you work. The keyframes are already baked.
- Link Scale. Alt-click (Option-click on Mac) the Scale stopwatch on your logo or shape layer and paste the expression below.
a = thisComp.layer("Audio Amplitude").effect("Both Channels")("Slider");
s = linear(a, 4, 14, 100, 125);
[s, s]
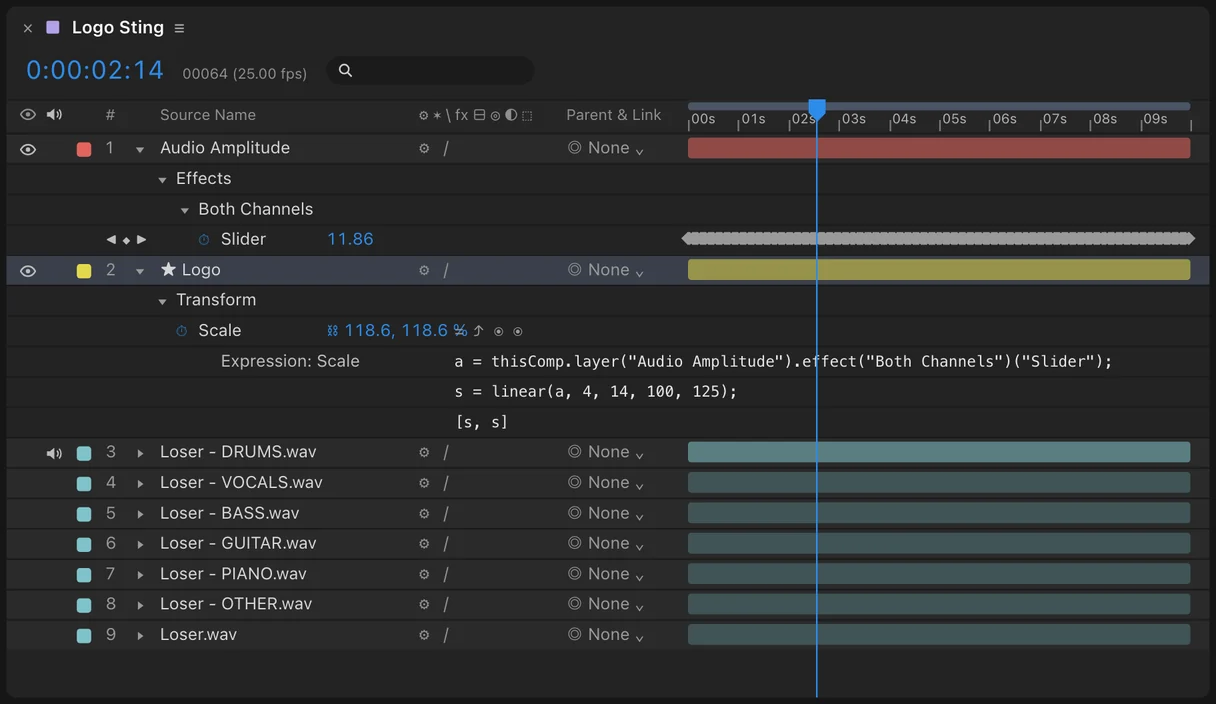
linear() maps the slider to a scale range. Anything at or below 4 stays at 100%, anything at or above 14 goes to 125%, and values in between scale smoothly. Open the Graph Editor on the Both Channels slider to see your real numbers: set the first value just above the level between hits and the second near the loudest kicks.
Make it punchier
- Raise the floor. If the layer still moves between hits, raise the first number (4) until the gaps sit at 100%.
- Animate to the bass instead. For a bass-driven track, convert the Bass layer instead of Drums and use the same expression.
- Two layers, two stems. Convert Drums, rename that null, then convert Bass. Drive Scale from the drums and Position or Glow from the bass.
- Smooth the jitter. Select the slider's keyframes and use The Smoother (Window, Smoother) with a low tolerance, or average a few frames in the expression.
- Cut on the drums in Premiere too. The same split in Premiere puts the drums on their own track, so the transients are easy to see when you cut.
Frequently asked questions
Why are my audio keyframes so high even when the song is quiet? Because Convert Audio to Keyframes measures everything audible in the comp. Pads, reverb tails and the vocal keep the level up. Convert a drum stem instead of the full song.
Can After Effects isolate the kick drum? Not on its own. EQ can keep the low end, but the bass guitar comes with it. A stem splitter gives you a Drums layer to convert.
Does it work with the Both Channels slider expression I already use? Yes. The stem method only changes what goes into Convert Audio to Keyframes. Your expressions stay the same.
Can I animate to the snare? The drum stem has the kick and the snare together. Raise the first number in the linear() expression so only the loudest hits register, which on most mixes are the kick and the snare.
Is the song uploaded anywhere? No. StemSplitter runs on your computer.
Does it work in Premiere? Yes. In Premiere the six stems land on six tracks. See how to separate stems in Premiere.
Sources
- Adobe Community: Convert Audio to Keyframes not accurate
- Adobe Community: automating clean keyframe bounces to a kick
- PremiumBeat: using audio to drive motion graphics
Adobe and After Effects are trademarks of Adobe. vogeledits is not affiliated with Adobe. Prices checked October 2026.